
Adventures in 3D printing, Part I

For the past 2 years, my friend Will and I flirted with the dream of buying a 3D printer. The possibility of printing our own cosplay props or knick-knacks has a quaint, creative allure.
Which happens to be my middle name! Alexander Danger Quaint-Creative-Allure [redacted]. My driver’s license is hysterical.
The barrier between this dream and reality, other than the natural divide that separates the sleeping mind from the waking, had been knowledge, cost, and storage. If the past-tenses hadn’t clued you in, as of this year, I’m the proud owner of a FlashForge Adventurer 3 Lite 3D Printer.
Suck on that, Freddie Kruger! When my dreams become reality, they’re adorable little plastic doodads and not the physical manifestation of knife-hand murder. Well, those plastic doodads came with a few important lessons about heat and gravity and science.
Here’s a little primer on how I overcame some of the newbie hurdles.
Climbing the mountain
The scariest thing about 3D printing was knowing that I knew nothing. Socrates would be proud, hearing me say that. So I started where anyone would and everyone should: the interwebs. I Googled every kind of 3D printing primer I could find, until I got the broad strokes. First off, if you aren’t familiar with what a 3D printer is, it’s a device that uses a file to print an object in 3 dimensions. The file is a 3D model that has been “sliced” into instructions for printing a very thin layer at a time. These many sliced layers add up to one large 3D object as the printer moves along the Z-axis. 3D printing is an additive process, meaning it involves adding material on to form the object. I know this is kind of a no-duh, but it’s still helpful to understand. The opposite of this would be stone carving - you chip away at the marble to create the image you want. Instead, 3D printing is the equivalent of stacking tiny layers of stone on top of each other until you got a statue of David.

To illustrate my point about the “layers” thing, here’s a screencap of the FlashPrint interface. See how it’s sliced the sculpture of the pumpkin into 417 layers? Each layer is getting a thin stream of hot plastic to eventually make a pumpkin. Dani printed like 6,000 pumpkins for Thanksgiving décor this year, but that’s another story.
Remote camera monitoring tech is widely available now, and I wasn’t planning on printing from far away due to WFH during COVID.) At the time I purchased it, it retailed at $369.00. I bought it directly from the company’s website, and it delivered in 2 days. The printer comes with a heated bed that moves backward and forward, and an extruder that moves up and down and from side to side (3 axes, get it? Cool man). I also bought 2 rolls of filament from FlashForge, which is priced much higher than what you can find on Amazon.
Setting it up
Setup was quick and painless. The printer is all self-contained, so I basically pulled the whole thing out of the box, put it on the counter, and was done. There were some packaging materials inside and stickers to peel, but the process took maybe 10 minutes. We had to run a 6-10 ft. high-grade extension cord straight to an outlet to put it where we wanted it, which we tacked out of the way. Once we had the printer comfortably situated, we powered it on and it tweedled as all new devices should.
The user interface certainly has a learning curve, but the instructions and Quick Start were enough to get me going. We had to calibrate the Z-axis and feed filament through the extruder to ensure it worked, but again, the process did not take long, even with me triple-checking every step to ensure nothing was going to go wrong. I found the Wi-Fi to be cranky, and the interface didn’t play well with the first USB thumbdrive I tried. Eventually we were able to get it connected to the Wi-Fi and remote-send prints from our computers.

We couldn’t help but gush over the detail in this 3D printed Millennium Falcon, even if it did need a little cleanup with the pliers. Pretty prints like this make the occasional frusteration worth it.
FlashForge comes with its own slicing and printing software called FlashPrint. It’s not the smartest, but it is relatively easy to figure out. 3D print files are available in a number of locations for free or cheap. I recommend starting with free until you feel comfortable and confident with the printer. I also favor the more popular print models, as user-made designs can take a few iterations before they work out the kinks. Even so, printing will vary by printer and settings. Here are some great sites for finding some .STL files to play with:
Thingiverse.com – A great community and easy to browse and search. You can make a free account and bookmark files that you’re interested in trying. Also, users can comment, post images of their “Makes,” and upload “Remixes,” which are versions that they’ve modified from the original.
MyMiniFactory.com – A little more focused on the miniature makers, MyMiniFactory is a cool community of Makers that similarly post printable designs to download and comment on. It doesn’t have Remixes (which I like), but most of the other features rival Thingiverse. They also support paid content if you’re looking for exciting originals and are willing to fork over a few dollars. Dani and I backed a cool Kickstarter for a 3D modeling platform that was advertised on the website, and now I have a custom builder for a modular Dungeons & Dragons dungeon. Yes, deeply nerdy.
Yeggi.com – Yeggi is the Google of 3D model files. It searches tons of 3D communities, both free and charged. I don’t love the site itself, but it’s helped me find some more unusual prints that weren’t on Thingiverse or MyMiniFactory. You can pop out Search Options and exclude paid options, which I recommend.
Hero Forage - When you’re ready to come to the dark side of mini painting, Hero Forage lets you design tiny dudebros to your exact specifications and then buy an STL file for around $7. Designing and printing miniature versions of ourselves was deeply gratifying.
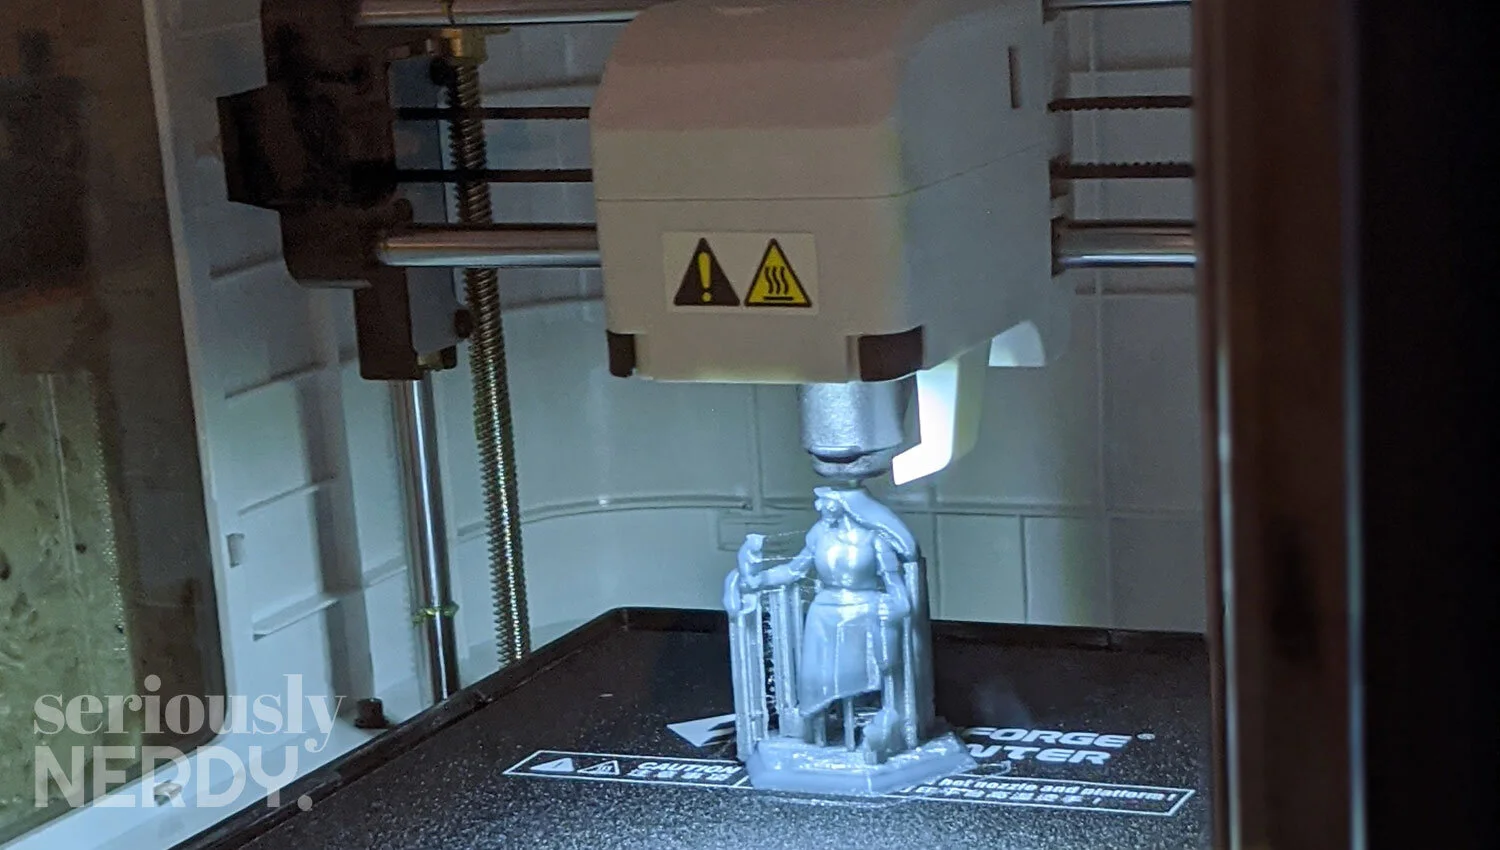
Dani used the Hero Forage tools to design and purchase a mini version of herself. She holds a squirrel and a bottle of bourbon. It was pretty on-brand for her.
For your first print, I recommend the legendary Benchy. 3DBenchy is a 3D model delightfully referred to as a “torture-test.” It has its own Wikipedia article, if you’re curious. It has a variety of holes, angles and surfaces that make it ideal for testing the printer’s performance. I popped open FlashPrint, “loaded” Benchy.stl, and then hit Print. We used the Adventurer 3’s standard print profile for PLA to start. The file transfer took maybe 5-10 seconds, and the printer started doing it’s thing, heating the based and extruder and then printing away. Our first Benchy printed flawlessly. It was really magical. I think every 3D-print enthusiast should have a Benchy: it’s like the dollar that you frame when you start a business.
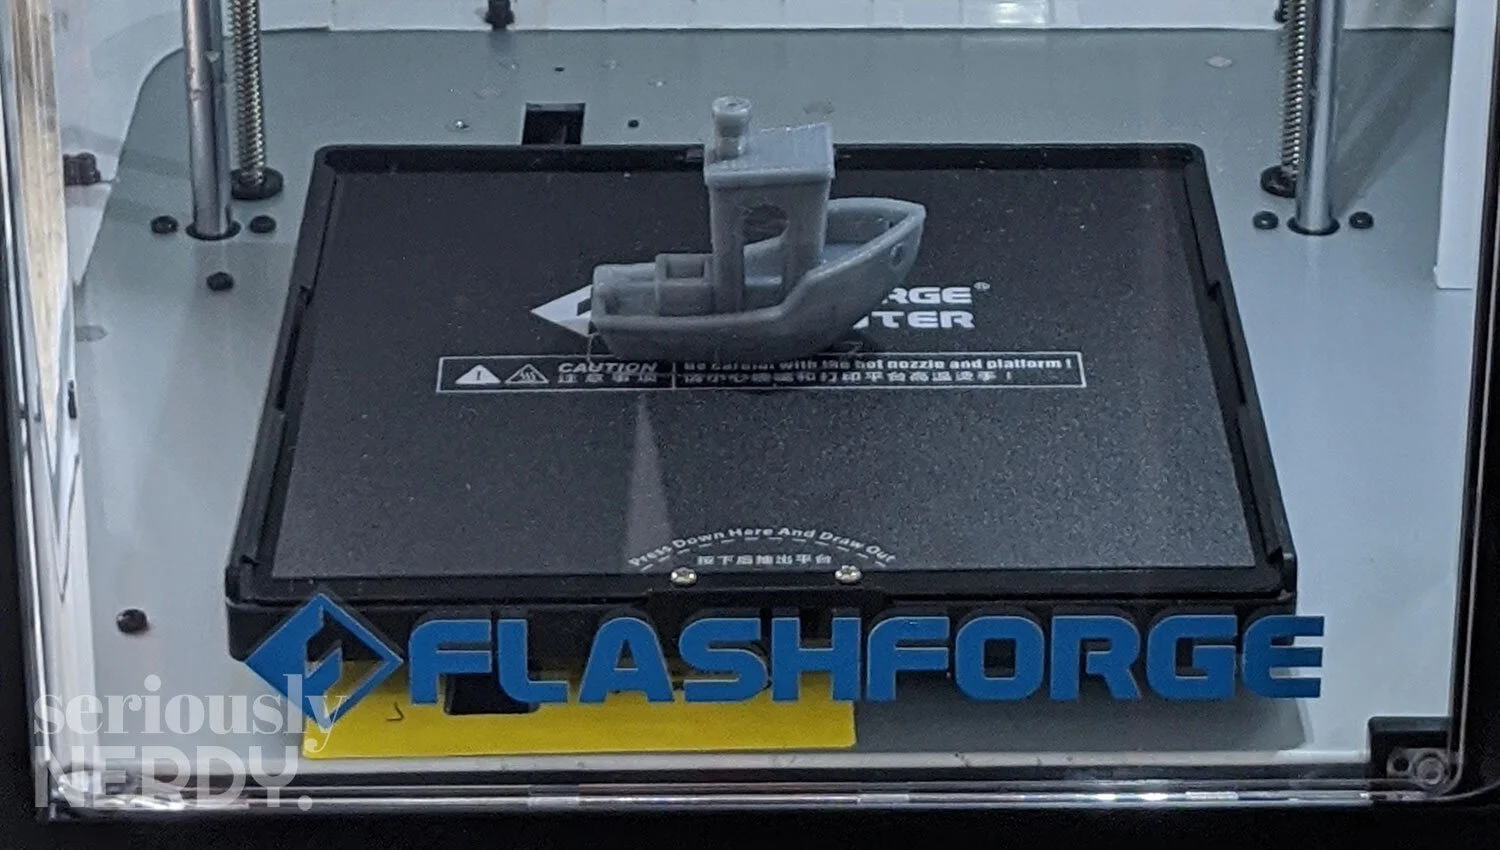
Shout out to this good boi, Benchy.
Quick sidebar on filament
We bought 1 roll of PLA and 1 roll of ABS from FlashForge. They came in 0.5kg spools, which match the spool chamber on the side of the printer. However, FlashForge charges an arm and a leg for their filament compared to pretty much every filament vendor on Amazon, so I found another brand I like that had good reviews referencing the FlashForge Adventurer 3. It took a while to find the settings for the TTYT3D Shiny Silk PLA, but the cost per kg was too attractive to ignore. We also melted a hole through the door on the side of the spool chamber so we could suspend the larger filament roll under our counter (1 kg rolls don’t fit the chamber) and run it through, and we haven’t had any issues with it feeding that way.
I love PLA. It does the trick. We also bought a roll of ABS to test the difference. The main difference: ABS sucks. Really. It requires a hotter temperature, bed adhesion is spotty, and I don’t care for it. I’d say stick with PLA. Even the house brand ABS was challenging to work with.

You know you’re getting the hang of it when an 18-hour print time and dozens of hand-placed supports don’t scare you. Also skulls.
Now the fun part
Once we got our first print done, the world was our oyster. The whole process of learning to 3D print involves attempting various prints, fiddling and honing your settings, and then re-printing them better. Get ready to have some bad fails. Supports will fail, beds won’t adhere, extruders may get clogged. And you’ll learn what all those phrases actually mean!
I’ll have more blogs about what we learned after the set-up stage, but the next step is just foraying out into the unknown (get it, Elsa).
Go forth and print your dreams!